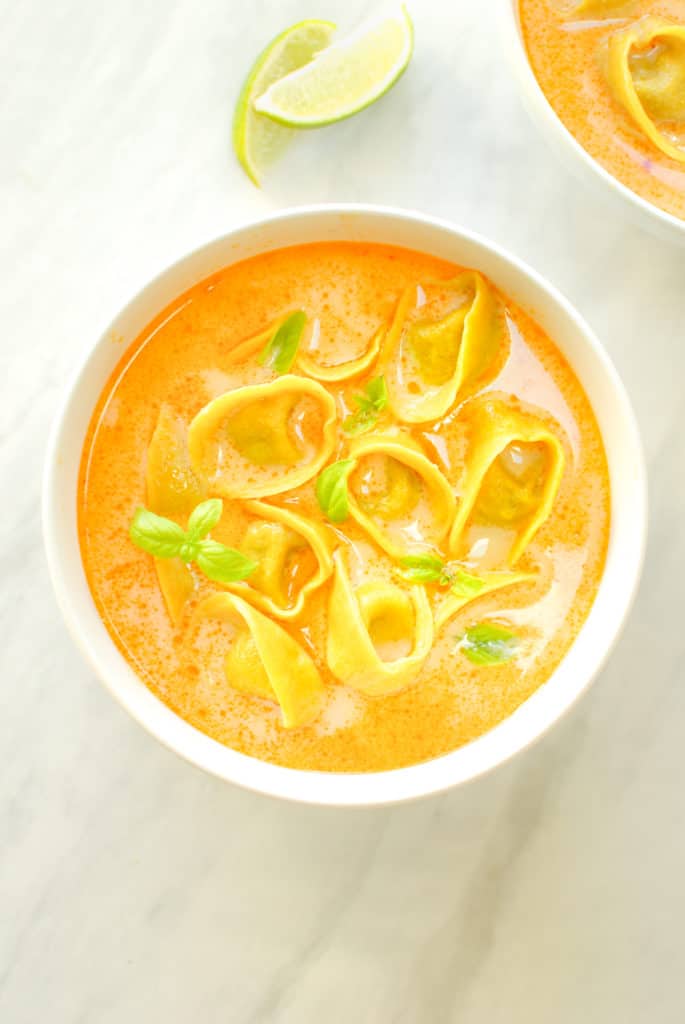
The dream of fall is very much alive thanks to these vegan pumpkin tortellini. This recipe is packed with warming flavors of ginger, turmeric, garlic, coconut, and pumpkin- perfect for eating in fuzzy socks and snuggling up next to loved ones. Even if you’re not a fan of the sweet pumpkin recipes, made with pumpkin pie spice— this is a savory one you’ll enjoy.
Use this recipe to take time for yourself as you prep these adorable pasta bites and as you treat yourself to a bowl of piping hot golden milk inspired satiating goodness.

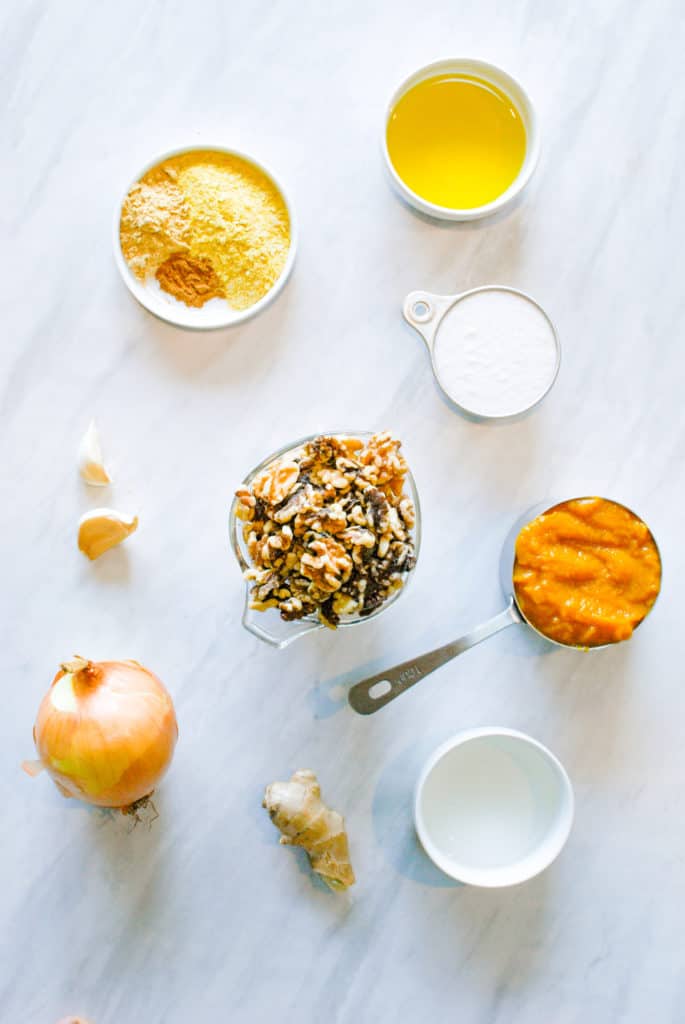
Prep The Pumpkin Filling
Who woulda thought the flavors of golden milk would pair so beautifully with pumpkin– trust us, this combo is hitting just right. The filling comes together in one pan on the stove in about 20 minutes time. Also note: the pumpkin filling for these tortellini can be made a day in advance and we recommend it as folding pasta takes time.
Basic steps to make the vegan tortellini filling:
- Toast the walnuts (optional but really develops their flavor!)
- Dice and saute the onions, mince and saute the garlic
- Finely chop the walnuts by hand or in a food processor
- Add the chopped walnuts, pumpkins, coconut milk and spices to the onion mixture
It really is simple! You can use any kind of nuts you have already if you don’t have walnuts on hand. We like to make this recipe as a way to use up a half can of pumpkin puree we may have sitting around in the fridge from fall baking.
If you have recently made a sweet pumpkin treat like pumpkin pie, pumpkin biscotti, or pumpkin muffins- this recipe is a great way to use up the rest of your pumpkin puree and switch gears to savory!
Prep The Vegan Pasta Dough
Now hearing groans and eye rolls from the crowd… we swear homemade pasta dough is not hard to make, even if it’s vegan! This vegan pasta dough is an institution of our house- it is infinitely easy to make AND remember. Break free from your recipe strongholds! Go forth and make pasta!
Our trusty method of making vegan pasta is equal parts by weight all-purpose flour, semolina flour, and water. It’s ridiculously easy. With a simple kitchen scale, this dough comes together in 5 minutes flat. We have included estimated measurements by volume for those of you who don’t have a kitchen scale. You can pick one up for less than $10 and they serve a variety of purposes in the kitchen.
To make the vegan tortellini pasta dough, simply add semolina flour, all-purpose flour, and water together in a mixing bowl and combine until a dough forms. You may need to add a touch of water- do so slowly- 1 tablespoon at a time. The dough should be smooth and not overly sticky.
After making the dough cover tightly with plastic wrap and place in the fridge to rest for 30-60 minutes or up to 1 day.
How To Fold Pumpkin Tortellini
Now here is the tricky part: transforming a tasty filling and sheets of pasta dough into charming little broth capturing pasta pockets. You’ve got this. We’ll load you up with all our tips and tricks to help make this easy!
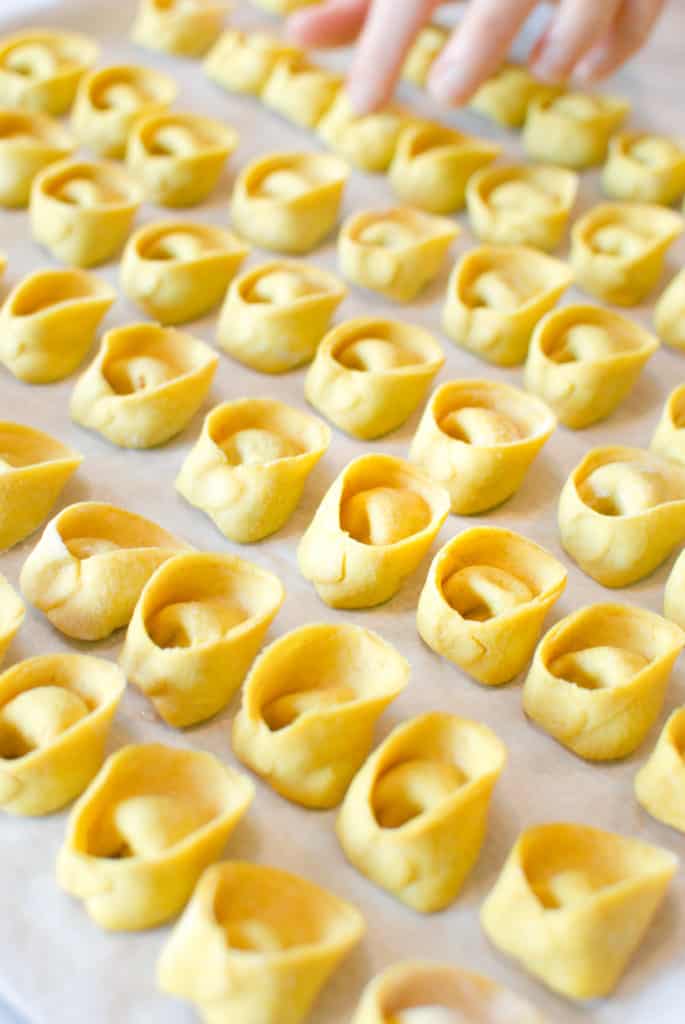
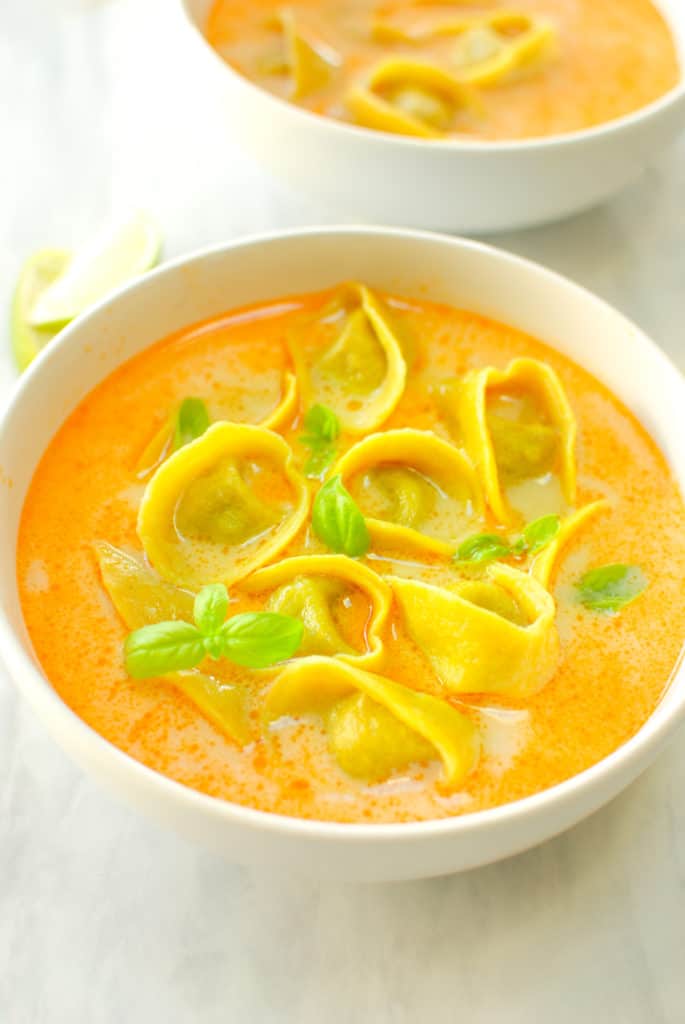
Tidbit: Tortellini are traditionally served in a broth or soup rather than with a sauce. Why you inquire? The shape of the tortellini creates the perfect little scoop to carry liquid in. Do you see the round crease at the top of the tortellini? This gets filled with broth as it if were a pelican scooping a fish out of the ocean. Tortellini are the pelicans of pasta, we’ve settled it.
Okay! Here’s what you’ll need to get started:
- A pasta roller. Technically you could roll the dough out by hand, but it needs to be very thin for making dumplings like this.
- A circular cookie/biscuit cutter or a glass with a small opening. Aim for 1.5″-2.5″ wide. Tortellini are small.
- We recommend placing the filling in a plastic bag and piping it onto the pasta. It’s less messy and faster than using a spoon.
- Extra flour nearby to keep your hands and surface adequately dusted.
- A parchment-lined baking sheet to place finished tortellini on.

Rolling out the pasta
Remove the dough from its resting place in the fridge. Place onto a floured surface and press into a disc shape. Use a knife or dough cutter and slice into 4 wedges. We’ll work with 1 piece at a time so keep the remaining 3 pieces covered under the plastic wrap to prevent them from drying out.
Flatten the piece of dough so it’s thin enough to begin working through your pasta machine. Use a rolling pin to get the dough 1/4″-1/2″ thick.
Begin at the thickest setting in your pasta machine, on most this is #7. Roll the dough through once at #7, then reduce to #6 and roll through. As you feed the dough into your pasta machine don’t let the thinner sheet of pasta rolling out the opposite end pile on top of itself as this can lead to sticking. Feed about half of your dough through the pasta machine, and double-check to ensure the thinned pasta sheet is laying flat- not folding over itself.
Usually, after #6 we will pause and sprinkle a touch of flour on the dough at this point. Resume feeding and rolling the pasta dough down to #3 for tortellini.
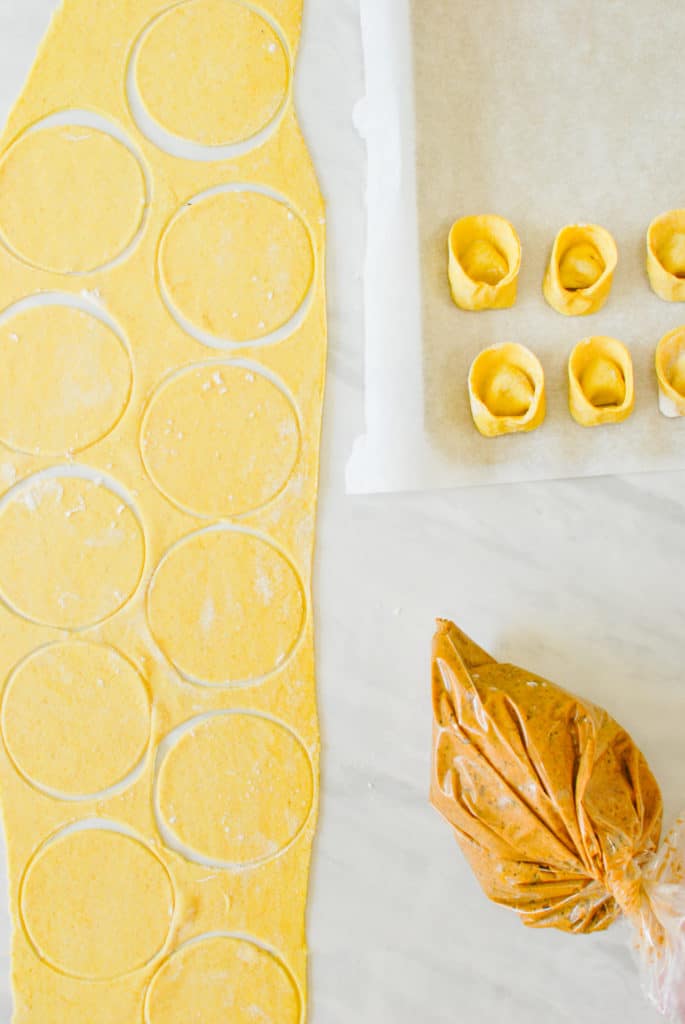
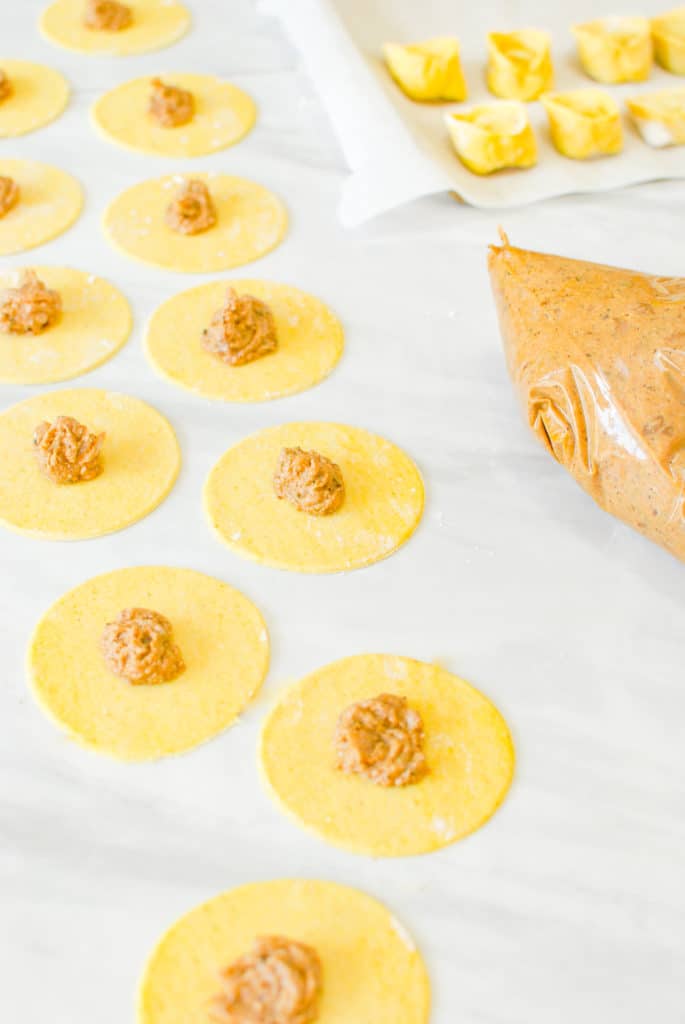
After rolling the dough through the #3 setting it’s time to cut, fill, and wrap! Lay the sheet of pasta on a flat surface and use a cutter or the opening of a small glass to make circles. ProTip: Dip the glass or the cutter in flour after making 2-3 circles to help prevent sticking. Remove the dough scrapes and place under the plastic wrap with the remaining 3 pieces of dough.
Pipe 1-2 teaspoons of filling into the middle of each circle. While you’re getting the swing of things and learning to shape the tortellini, we suggest using less filling to have more dough to work with.
Folding the tortellini
Once you have your first sheet of pasta cut into circles and 1-2 teaspoons of filling in the middle of each circle, it’s time to fold! This will take some trial and error, and a touch of finesse but you can do it!
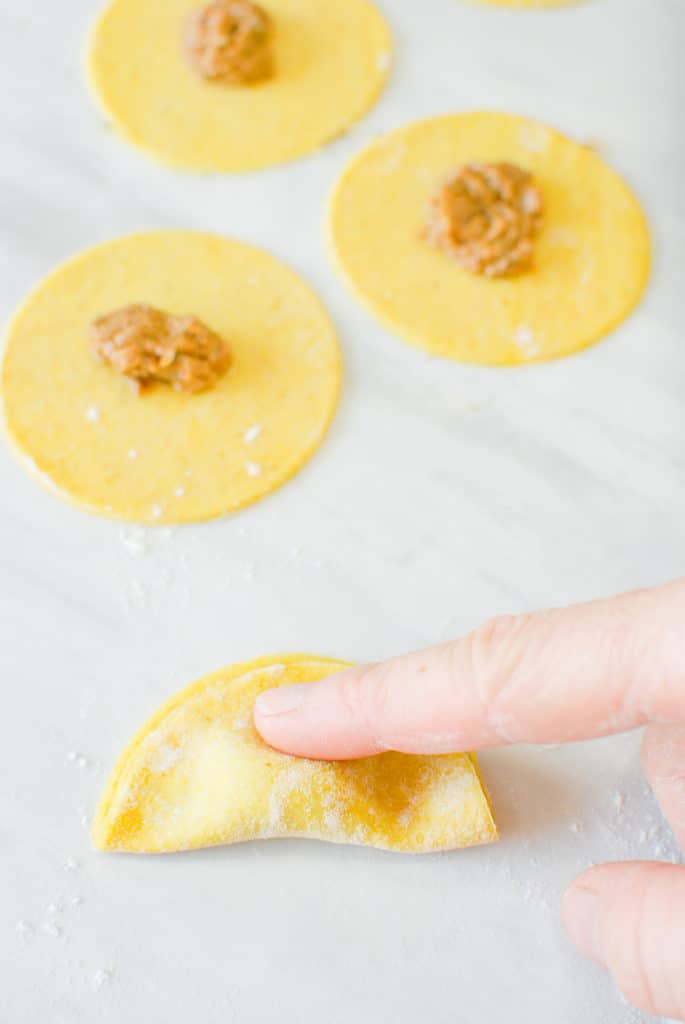
Fold the dough circle in half. Begin pressing and sealing the dough together at the top of the tortellini prior to the sides.
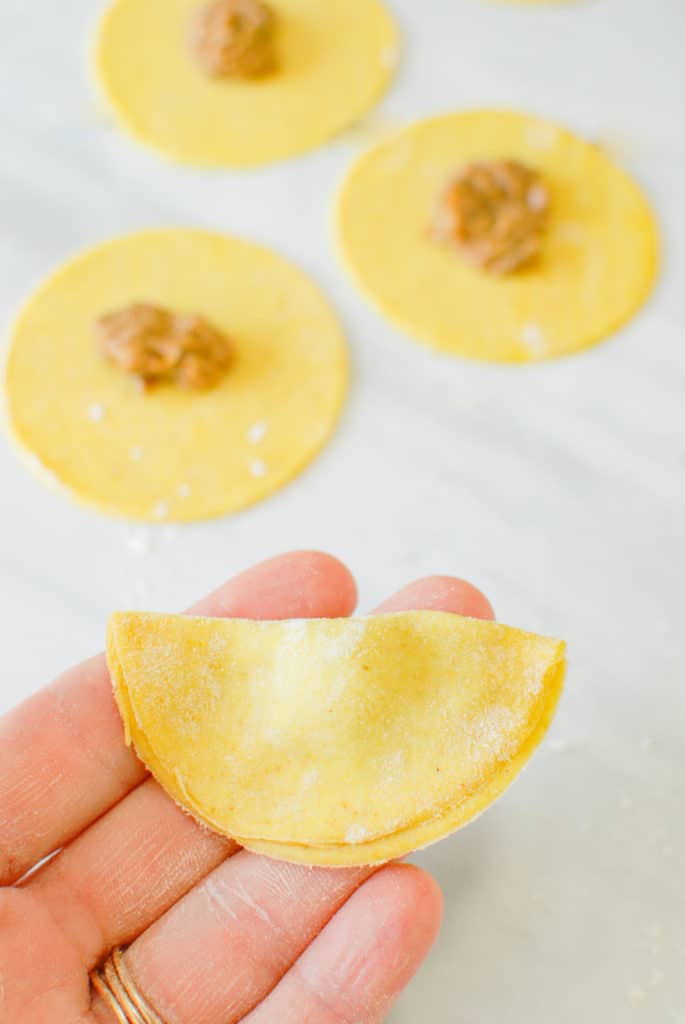
Take the fully sealed half-circle in your hand and center the flat edge of the dumpling in front of your middle finger.
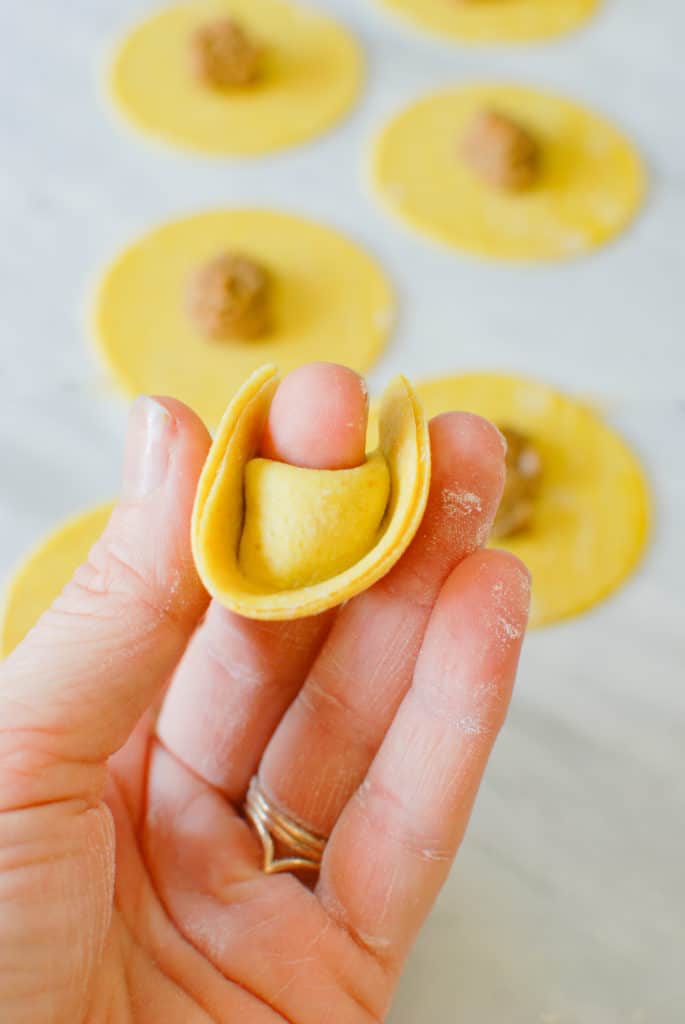
For your tortellini to look similar to what you see for sale in the store, there needs to be a visible loop or hole in the dumpling.
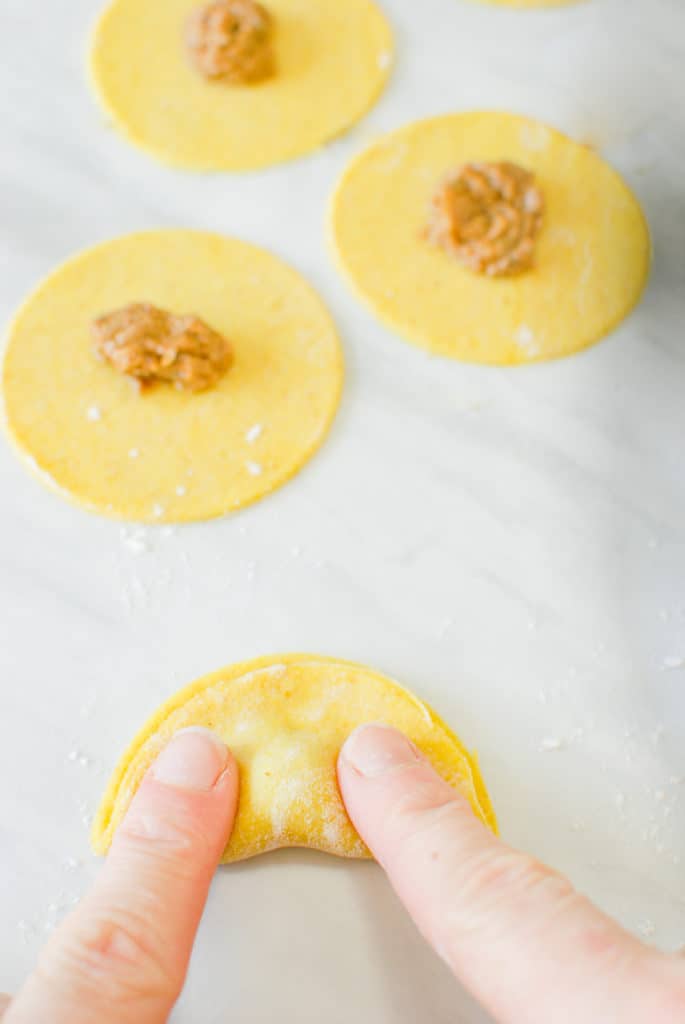
Once the top is sealed well, press and seal around the remaining filling. It will take practice, but try to squeeze out any air bubbles!
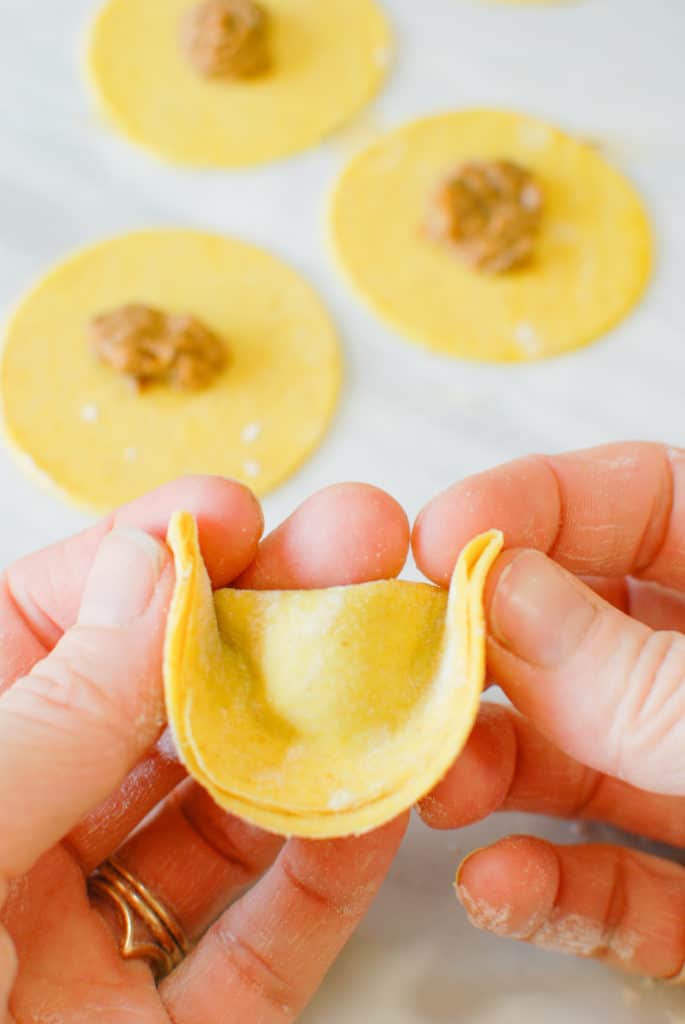
Pull the tips down and around your middle finger. It helps if you slightly push your middle finger into the tortellini center.
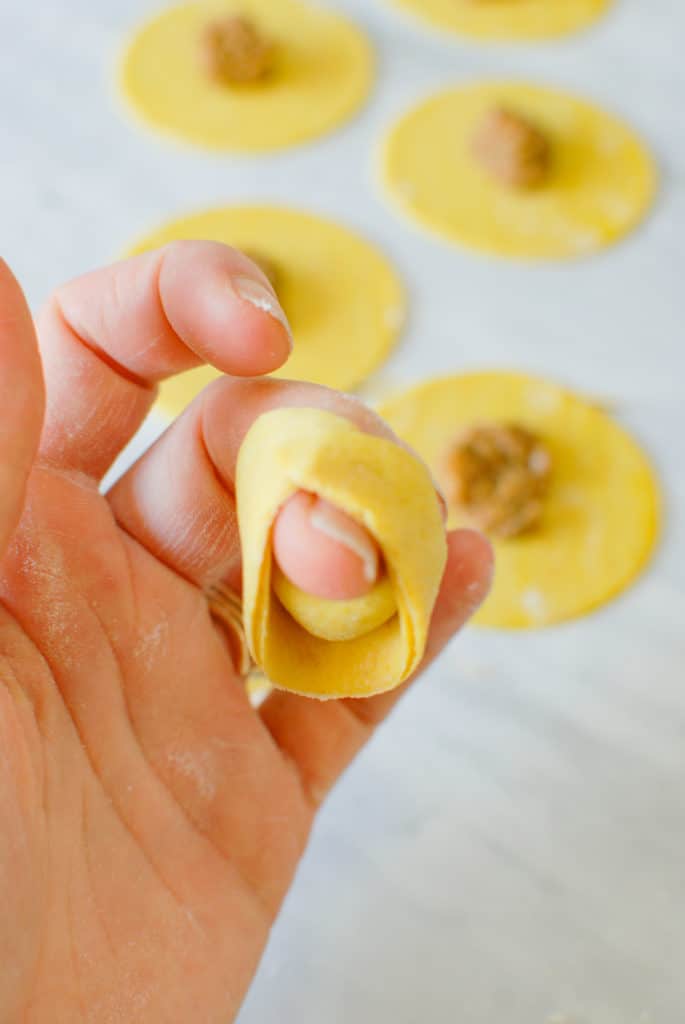
To achieve this, only press the tips of the half-circle together, don’t wildly overlap them! Press firmly for a good seal.
Pumpkin Tortellini Troubleshooting
Folding tortellini takes practice. We tested this recipe 3 times prior to publishing this recipe, meaning we folded nearly 300 tortellini! We took notes along the way of tips and tricks that were helpful, if you’re frustrated and struggling check these out:
- Ensure all ingredients for the filling are very finely chopped or they will clog the piping bag! (Walnuts, onions, garlic)
- Don’t try to make tortellini with a pumpkin-filling that is hot, chill the filling prior to wrapping the tortellini- the dough will be easier to work with.
- Do not overfill the tortellini! It’s so tempting to add more filling, but it is way more difficult to fold them if there the ratio of filling/dough is off.
- If the tortellini aren’t properly sticking and sealing together as you fold them use a damp paper towel. Prior to folding the tortellini take a damp paper towel and dab the perimeter of the circle- this will help the pasta adhere to itself.
- When you are working with fresh pasta dough, ensure your workstation is lightly floured at all times. Also, make sure your cookie cutter or glass and fingers are lightly floured as well.
- To make tortellini that look similar to storebought versions use a smaller circle/cookie cutter. Keep in mind if you are making smaller tortellini this recipe will yield more tortellini (more tortellini to fold)
Pumpkin Tortellini FAQs
- What goes good with tortellini? Tortellini can be served with a green salad, toasted bread, or roasted vegetables. We usually add tortellini to hearty soups and stews.
- What is the difference between ravioli and tortellini? Ravioli are larger in size and usually eaten with a heavier sauce. Tortellini are smaller in size and are traditionally served in soup or broth.
- How do you know when tortellini are done? Tortellini pasta will float to the surface of the water or broth when they are fully cooked.
- Can you freeze fresh tortellini? Yes, fresh tortellini freeze wonderfully. Place the fresh tortellini on a parchment-lined baking sheet to freeze, once frozen remove and store in a plastic bag up to 3 months.
- Can you cook frozen tortellini? Yes, cook frozen tortellini in boiling water or in a sauce for 3-4 minutes or until they float to the top of the water.
- How do you store fresh tortellini? Store fresh tortellini in a single layer on a plate or baking sheet covered in plastic in the fridge for up to 3 days.
- Can you cook tortellini in the sauce? Yes, you can cook fresh or frozen tortellini in sauce/broth, simmer covered for 3-4 minutes until tender and floating at the surface.
- Can you make tortellini ahead of time? Yes, make tortellini ahead of time and store in the fridge for 3 days or freeze up to 3 months.
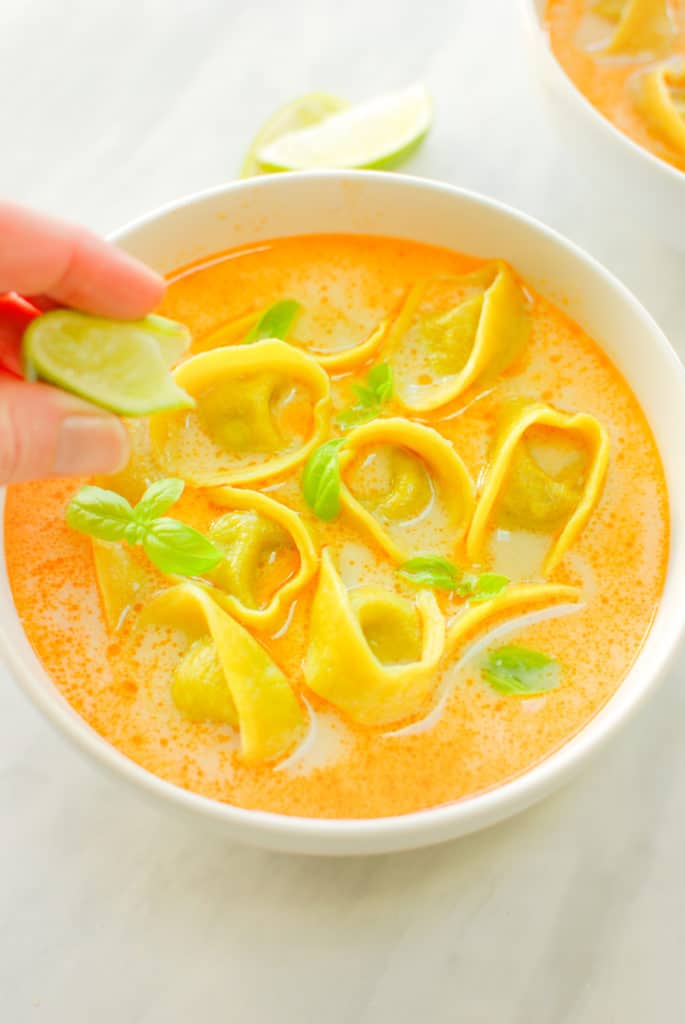

Golden Milk Inspired Pumpkin Tortellini
- Prep Time: 60 minutes
- Cook Time: 25 minutes
- Total Time: 1 hour 25 minutes
- Yield: 80 tortellini 1x
- Category: Recipes
- Method: Stovetop
- Cuisine: Pasta, Italian
Description
This warm, cozy bowl of vegan pumpkin tortellini are inspired by the flavors of golden milk- turmeric, ginger, coconut, and black pepper. If it’s been a long week and you need a big bowl of something warm and nourishing you can trust these vegan pumpkin tortellini!
Ingredients
For the pasta dough:
Equal parts by weight semolina flour, AP flour, and water!
- 150g semolina flour (about 3/4 cup + 2 tablespoons)
- 150g all-purpose flour ( about 1 cup + 2 tablespoons)
- 150g water ( about 2/3 cup)
- 2 teaspoons turmeric powder
- pinch salt
For the pumpkin totellini filling:
- 1.5 cup toasted walnuts
- 1 cup pumpkin puree
- 1 medium onion, diced
- 4 cloves garlic, minced
- 2 tablespoon olive oil
- 1/4 cup fresh sage, finely chopped
- 1/2 teaspoon cinnamon
- 2 tablespoon nutritional yeast
- 3 tablespoon white wine vinegar
- 2” minced fresh ginger
- salt & pepper to taste
For a golden milk broth: Optional: Heat the following ingredients in a medium saucepan until flavors incorporate or 5-7 minutes. You can cook fresh tortellini in the broth by simmering them for 3-4 minutes!
- 2 cups coconut milk
- 2” minced fresh ginger
- 1 tablespoon chili oil (optional)
- 1 teaspoon chili garlic sauce
- 1 teaspoon miso
- 1 tablespoon brown sugar, coconut sugar, or maple syrup
- juice of 2 limes
- salt & pepper to taste
Instructions
To make the tortellini dough:
- Preferrably using a kitchen scale, measure equal parts semolina flour and AP flour- 150 grams of each and add to a mixing bowl. If not using a scale: about 3/4 cup + 2 tablespoons semolina flour & about 1 cup + 2 tablespoons AP flour.
- Measure 150 grams of water and add the 2 teaspoons of turmeric. Stir well to fully incorporate.
- Add the water to the mixing bowl with flour and mix until a dough forms. The dough should form into one cohesive, smooth ball. If it’s a bit on the sticky side, this is okay as flour is added during rolling.
- If you aren’t using a kitchen scale for exact measurements, you may need to add a touch more water to form a dough. Add more water 1 tablespoon at a time.
- Wrap dough with plastic wrap and place in fridge to rest for at least 30 minutes and up to 24 hours.
To make the pumpkin filling:
- Toast the walnuts on the stovetop over medium heat for 7-9 minutes, watching closely so they don’t burn.
- Remove the nuts and set aside to cool. Add the olive oil to the pan and warm over medium heat.
- Add the garlic and onions and sautee for 5-7 minutes until soft and translucent. Add salt.
- Add the coconut milk, pumpkin puree, vinegar, cinnamon, ginger, and nutritional yeast.
- Run the walnuts through the blender or food processor until very finely chopped. Add the the onion mixture.
- Remove from heat, add the chopped fresh sage and stir to incorporate.
To wrap tortellini:
- Remove pasta dough from fridge, shape into a disc and cut into 4 sections.
- Flour your cutting board and work with 1 section at a time. Roll the dough out to 1/4″ thick to prepare for your pasta machine. Begin rolling at the thickest setting– for us it’s 7.
- Every few times through the pasta machine be sure to sprinkle your dough with flour, sprinkle prior to beginning at #7, sprinkle again at #5, and again at #3.
- After rolling your pasta dough all the way down to the #3 setting it’s time to fill and wrap your tortellini!
- Using a 1.5″-2.5″ circular cookie/pasta cutter or a small glass, make as many circle shapes as will fit on your sheet of pasta dough. Remove the scraps and place under plastic wrap with remaining dough sections.
- Fill a plastic bag or pastry bag with pumpkin filling. Pipe/squeeze 1-2 teaspoons of filling into the center of each pasta circle. If you are new to folding dumplings, start with 1 teaspoon of filing until you get the hang of it.
- Start with one tortellini: fold the circle in half and seal the top, rounded portion of the dough just above the filling. Once the top is sealed, work your way down and around the rest of the filling and try to remove any air pockets around the filling.
- Place the sealed half circle on your hand with the flat edge centered just below your middle fingertip.
- Wrap the tips/two ends of the tortellini back and around your middle finger until just overlapping. Press firmly to seal.
- This technique takes practice! Take your time- as long as the tortellini are sealed tightly it will taste great even if the first dozen you make aren’t the prettiest.
- Check out the photos in this post and the tips and tricks section to perfect the tortellini wrapping!
- To cook fresh tortellini bring a medium pot of salted water to a boil. Add tortellini and cook until they float to the surface, about 3-4 minutes. Cook frozen tortellini the same way, simply increase cooking time by 1-2 minutes.
Notes
** To freeze fresh tortellini arrange in a single layer on a baking sheet and place in freezer until frozen. Then remove and store in container.
** You can make the pasta dough and filing in advance to allow plenty of time to shape the tortellini on the day you intend to eat them. The filling and pasta dough can be made 1 day in advance- store the pasta dough in plastic wrap in the fridge.
** You can make tortellini with a larger or smaller circular cutter. Traditional tortellini are smaller in size- using about a 1.5″ cutter. A glass with a small 2.5″ opening will create tortellini that are larger than store bought varieties but still have the shape of tortellini.
** Nutritional information is for the tortellini pasta dough & filling, this does not include the broth.
Keywords: Vegan Pasta, pumpkin recipes

Share your thoughts about "Pumpkin Tortellini"