
Adriana has published hundreds of recipes online and is a Board Certified Nutritionist. Read our recipe development process or more about Adriana.
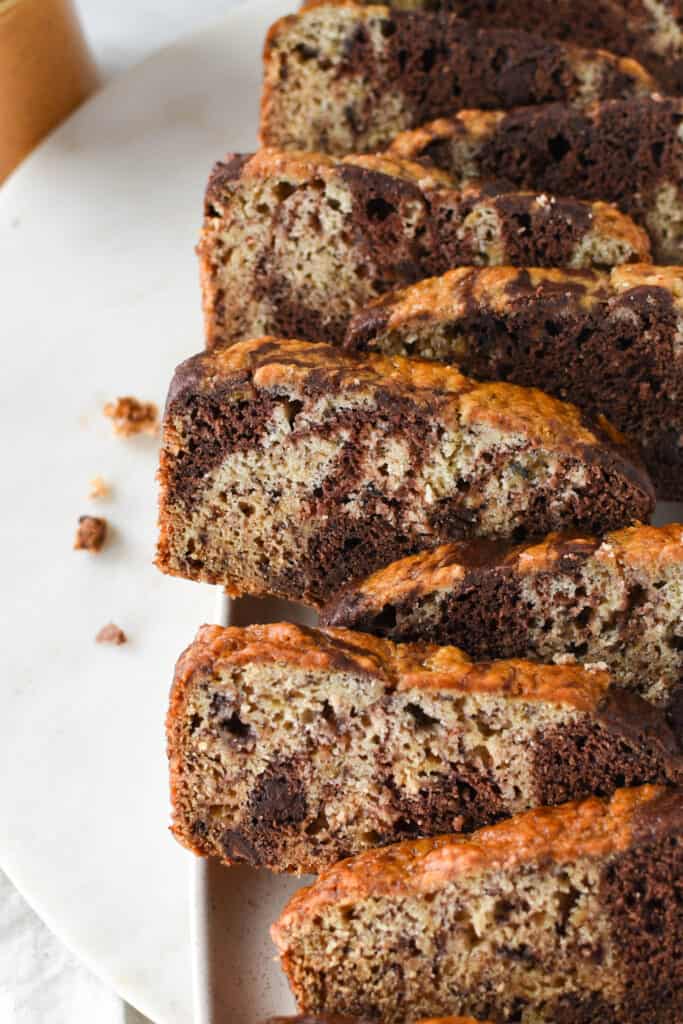
Marbled banana bread is a fancy spin on classic banana bread that looks impressive but is incredibly easy to make! This is a regular banana bread with a chocolate swirl running through it for the marbling effect.
The marble swirl offers more than just visual appeal- as it’s colored by cocoa powder, the brown swirls have a delicious chocolatey fudgy flavor. Our household really enjoys this loaf! It’s not quite as indulgent as a full-on chocolate banana bread, while still being a fresh twist.

(This post may contain affiliate links. That means I’ll get a small commission on any sales made through those links. Read our full disclosure.)
Ingredients For Marbled Banana Bread
This recipe comes together quickly and uses common pantry ingredients– as long as you have yourself some ripey ripe bananas, you’re ready to roll. Everyone raves that the chocolate/banana combo is just to die for! Each slice is a surprise, some slices have more chocolate and others have more regular batter. That’s part of the fun 🙂
Bananas: Use 2-4 bananas that are ripey ripe, depending on size. If you have extra large bananas use less, if you have smaller bananas, use more.
Cocoa Powder & Chocolate Chips: You must use cocoa powder to get the dark-colored batter and chocolate swirl. We say you should also add chocolate chips to the chocolate batter.

Flour: This recipe has only been tested with all-purpose flour.
Sugar: We used cane sugar in this recipe but brown, coconut, or granulated white sugar will all work.
Baking Soda & Baking Powder: Baking soda is activated in this recipe by the banana and cocoa powder to create loads of lift! Baking powder assists in this effort. If you don’t have baking soda, you can use 2.5 teaspoons of baking powder. Baking soda assists with browning up that gorgeous golden exterior.
Melted Butter: Dairy or non-dairy butter can be used! You can even use a neutral flavored oil, but we prefer the taste and texture of using melted butter.
How To Marble & Swirl Banana Bread
Baking up a loaf of banana bread is similar to all other quickbreads like muffins, pancakes, and waffles. For the marbling effect, we’ll make one batter and then flavor half of it for simplicity’s sake. It’s not complicated to get the marble swirl, it just takes an extra step or two.
Into a mixing bowl, add peeled bananas and mash thoroughly. Add remaining wet ingredients and combine. Sprinkle dry ingredients across the wet and mix until just incorporated.
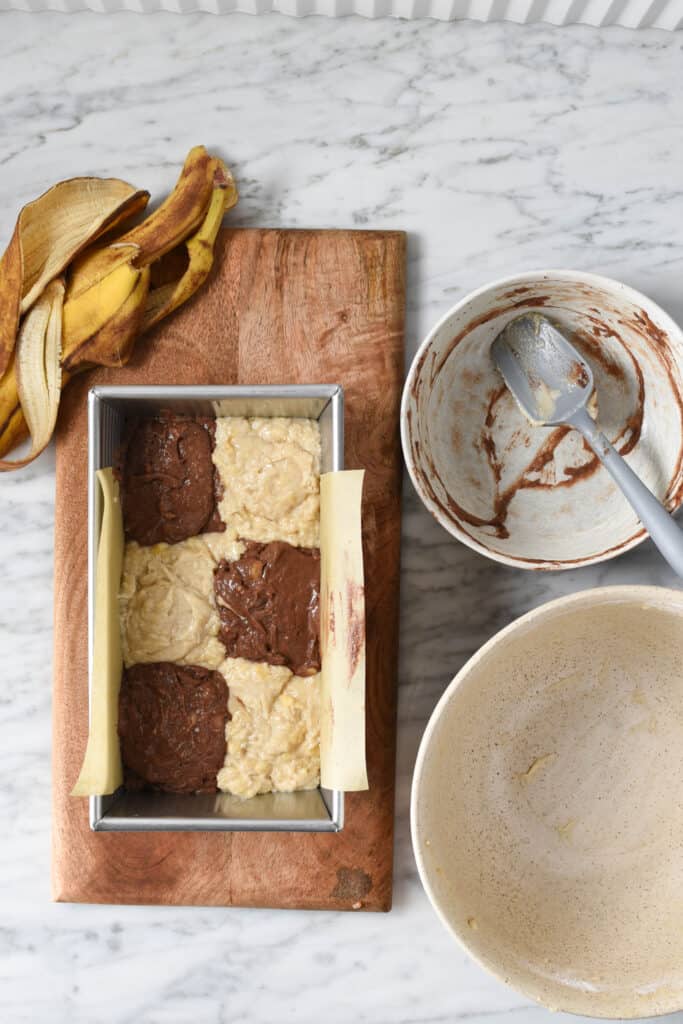
Now, divide the batter in half (just eyeball it/give your best guess), and in half of the batter add the cocoa powder, splash of milk, and the chocolate chips. Mix to combine.
Next, line your loaf pan with parchment paper. Drop the batter into the pan in an alternating pattern as shown in the images. Then use a butter knife to make the marble swirl. This is best accomplished by sticking the butter knife straight down into the far edge of a chocolate batter section and dragging it through all the way to the far edge of a regular batter section.
Once baked and removed from the oven, it’s best to leave the loaf to cool for 15-20 minutes in the pan before handling it. It will firm up as it cools and will be easier to cut with slices more fully intact.

Tips On Swirling The Loaf
#1 You can work in a left-to-right fashion repeatedly (short edge of the pan) or top to bottom (long edge of the pan). I usually do all the batter pairs (a chocolate and regular section) left to right then go through the pan top to bottom on each side of the long side.
#2 Regardless of how you swirl it, just don’t overdo it! There’s no going back 🙂
#3 The swirl looks more pronounced after baking.
#4 If you turn the butter knife so you’re using the side of the blade vs. the top line, it will bring more chocolate dough into the regular and create a better, deeper swirl!
#4 Always begin in a chocolate section and drag that over to the regular (light) section. The swirls can get lost as the loaf rises and bakes if you drag the lighter batter into the chocolate.

How To Tell When Banana Bread Is Done
The toothpick test is your best bet for testing the doneness of this banana bread! Insert a toothpick into the center of the loaf and remove it- there shouldn’t be any wet batter on it. If there is wet batter present, bake for at least another 5 minutes. You’re looking for a clean, dry toothpick or only a few moist crumbs.
Additional things to note on checking doneness:
#1 Look at the edges of the loaf, they should have pulled inward from the pan a bit and feel firm/set.
#2 The amount of bananas you use plays a part here! More mashed banana = a wetter dough and more moisture to cook out. This is ok, just keep in mind banana bread can take anywhere from 45-70 minutes!
#3 The size of the loaf pan you bake in. There are two very common loaf pan sizes: 8×4 and 9×5. The 9×5 pans create shorter, wider loaves that cook up a bit quicker. An 8×4 pan takes longer as it’s a taller loaf! (which we prefer)
#4 The material of the pan! A light-colored metal pan is ideal for all your baking projects as light-colored metal evenly distributes heat and cooks things most evenly. For dark metal or glass pans, the heat transfer is more intense- meaning the edges will cook up faster than the center. If using a metal or glass pan you may need to kick down the temp by 25* or tent the loaf with aluminum foil for the last 10-20 minutes if you notice the edges becoming too dark or dry.
The Best Way To Store Swirled Banana Bread
Marbled banana bread will stay good for up to 4 days at room temp. We recommend storing the loaf in a container at room temp with the lid slightly ajar so the top doesn’t get sticky. You can also store it in the fridge fully covered.
Banana bread works amazingly well in the freezer. Wait for loaves to come completely to room temperature (4-6 hours) then wrap them several times with plastic wrap and store them in a plastic bag in the freezer to prevent freezer burn.

Marbled Banana Bread FAQs
- How to add a banana to the top of a loaf of banana bread? For dramatic effect and a gooey, banana-y bite in each slice, you can add a whole banana to the top of your loaf before baking. Slice the banana lengthwise and place it into the loaf, cut the side (center of the banana) up and gently push down into the batter. Stagger both halves of the banana on the loaf if you like. Or, you can slice the banana into rounds and add those to the top.
- Why didn’t the banana bread crack on top? Running a butter knife through the batter is actually a trick to help guide where the crack happens in banana bread and help it become less pronounced. By swirling the two batters with a knife, it helps reduce the crack!
- What kind of cocoa powder to use? This recipe does not require Dutch-processed cocoa powder, the good ol’ natural cocoa powder you find in stores is ideal!

Marbled Banana Bread
- Prep Time: 15 minutes
- Cook Time: 55 minutes
- Total Time: 65 minutes
- Yield: 1 loaf 1x
- Category: Vegan Breakfast
- Method: Oven
- Cuisine: American
- Diet: Vegan
Description
Marble Swirled Banana Bread is a fancy and unique take on regular banana bread! It’s really easy to make but so impressive to serve. The flavor combination of chocolate and banana is straight delicious and chocolate chips add a fudgy dimension to things. You’re gonna love it.
Ingredients
Wet Ingredients:
- 3–4 peeled bananas* note
- 1/3 cup melted butter or neutral flavored oil* note
- 1 teaspoon vanilla extract
Dry Ingredients:
- 1.5 cups all-purpose flour
- 1/2 cup cane sugar (sub-white, brown, or coconut sugar)
- 1 teaspoon baking soda
- 1/2 teaspoon baking powder
- 1/2 teaspoon salt
For the Swirl Batter:
- 2 tablespoons cocoa powder, sifted
- 1/3 cup chocolate chips
- optional 2 teaspoons of milk, to mix
Instructions
- Mix the wet ingredients. Add peeled bananas to a medium-sized mixing bowl and mash very well. Add vanilla extract and melted butter and mix.
- Sprinkle dry ingredients across the top of the wet. Mix until just combined.
- Pour half of the batter into a separate bowl and to this bowl add the sifted cocoa powder and chocolate chips. If the batter is too thick, add 2-3 teaspoons of milk to make up for the cocoa powder addition.
- Line a loaf pan with parchment paper and pour the batter in, alternating the regular and chocolate batters.
- Insert a butter knife into a chocolate batter section and pull it through the batter over to the far side of the corresponding regular batter then lift and remove the knife. Repeat this with all chocolate/regular batter pairs.
- Bake in a pre-heated 350* oven for 55-65 minutes, until a toothpick inserted in the middle removes with only a few dry crumbs and no wet batter.
- If using a 9×5 loaf pan, the loaf will take less time to cook. Begin to check at the 45-minute mark.
- If using dark metal or glass pan, you may need to dial back the temp 25* as these pans tend to cook up the edges faster than the center.
- If using a large amount of bananas, the loaf will take longer to cook! Banana bread can take up to 70 minutes to complete cooking.
- Leave the loaf to cool in the pan for 15-20 minutes before removing and slicing for best results. The loaf will firm up a bit as it cools.
Notes
There are two very common loaf pan sizes: 8×4 and 9×5. The 9×5 pans create shorter, wider loaves that cook up a bit quicker. An 8×4 pan takes longer as it’s a taller loaf!
On Bananas: If using 4 large bananas, the loaf may take a bit longer to cook. If using smaller or fewer bananas, you may need to add a small splash of milk to help the batter come together appropriately. Splash meaning 1-2 teaspoons! The batter should be thick but not resistant to incorporating all dry spots of flour.
Oil vs Butter: Melted butter makes banana bread with a better flavor and texture. Using oil creates a very moist banana bread but it may have a gummier consistency.
Keywords: Marbled Swirled Banana Bread
Share your thoughts about "Marbled Banana Bread"